Recipe: Chocolate Mousse Cake
His birthday, his request. I delivered. (I hope)
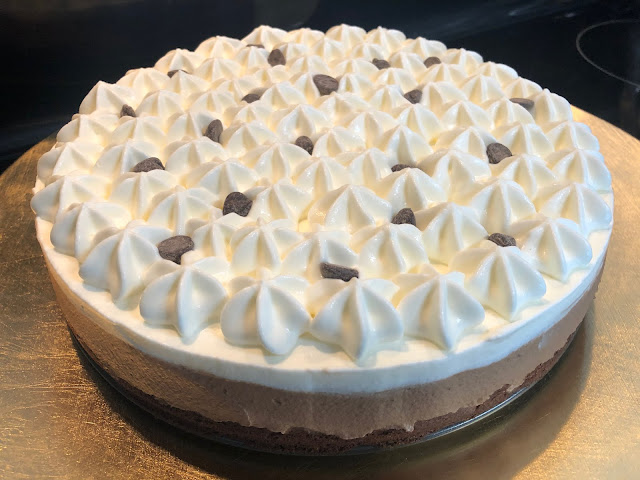
Ever since we lived in the Philippines, Carl's favourite has always been the "Red Ribbon Chocolate Mousse Cake" and this has consistently been his request for every birthday. For those who don't know, Red Ribbon is a pastry shop/bakery chain in the Philippines that serves a variety of baked goods from bars, cakes, loaves... you name it. I'm not an endorser by the way, but hey... I'd entertain it if the opportunity presented itself. Anyways, this may just be the only cake that Carl seems to be able to enjoy and finish. Like just give him a few of days and he'll finish this whole cake by myself (No challenge needed, eh. He'll just want to finish this whole thing.) Between me and him, I'm the one who likes tasting different cakes, even though my favourite will always be a straight-up vanilla cake with vanilla buttercream frosting. So when we moved here to Canada, every year Carl celebrates his birthday, I try getting him a new chocolate mousse cake from a different pastry shop hoping it's as close to his favourite one. It's almost been a decade with us here in Canada, and yes... that's how many years and how many different cake sources we've tried as well.
Not this year.
Since it's 2020 and I'm home now (together with the whole world), naturally when I asked Carl what cake he wanted, he requested the Red Ribbon cake again. So... I took a stab at it. There were some recipes already available online but I didn't really like the addition of gelatin or egg yolks. Gelatin just gives it that fake gummy/jelly feel. So I just stuck with the basics in my head and put them all together. I stuck with making a straight-up ganache and folding it into whipped cream. Good thing it held up! Oh! And yes, it kept well in the fridge and didn't collapse at all.
I thank the French for coming up with the "mousse". All the different applications and versions - sweet, savoury, textured, fruity, chocolate, duck liver even. Yes, the Chocolate Mousse originated from France but not really sure exactly when. They started with savoury mousses (in the cold kitchen, they'd make salmon or liver mousse) and later on developed sweet dessert mousse variations. And just so you know, you can celebrate this every year too because... April 3rd is National Chocolate Mousse Day.
Just for reference, the photo on the left below (not mine) is the Red Ribbon cake. Mine is on the right.


And yes... it took Carl about a week to finish this cake. I want to say I contributed to eating 2 slices worth. But he took the crown and owned it.
================================================
Chocolate Mousse Cake
This makes a truffle-like chocolate mousse cake. If you want it sweeter, there's a replacement below. I made this with a 9-inch springform pan. If you decide to use a 10-inch pan, it will be slightly thinner.
You'll need the following equipment: 9-inch springform pan, a saucepan, parchment paper, mixing bowls, a whisk, spatulas, pastry brush, an off-set spatula, hand mixer, piping bag with start tip, and... a hair dryer (optional).
Brownie Base Ingredients (bottom layer)
(You may or may not notice that my photos below show and have a slightly increased amount of ingredients... that's because I wanted to make extra batter so I could eat the brownies on its own. All mine!!! Don't judge me!)
1/3 cup all-purpose flour
1/4 cup dutch-processed cocoa powder
pinch of salt
1/4 tsp baking powder
1/4 cup butter, unsalted and softened
1/2 cup semi-sweet chocolate chips
1/4 cup dark brown sugar
1/2 cup granulated sugar
1/2 tsp vanilla
1/2 tsp instant espresso powder
2 eggs, large, at room temperature
extra butter for greasing the pans
Chocolate Mousse (middle layer) and Whipped Cream (top layer) Ingredients
2 cups heavy whipping cream (I used 35% whipping cream)
1/3 cup confectioner's sugar
1 cup semi-sweet chocolate chips
1 cup heavy cream (I used the same whipping cream... just so I finish the whole carton I bought.)
+ half of the sweetened whipped cream
***TO MAKE A SWEETER VERSION, use this instead of the above
3/4 cup semi-sweet chocolate chips
1/2 cup milk chocolate chips
1 cup heavy cream
+ half of the sweetened whipped cream
Brownie Base Procedure
1. Preheat your oven to 350℉. Grease your pan with butter and line with parchment paper. Set aside. Sift together all the dry ingredients in a bowl and whisk. Set aside.


------------While waiting for the base to cool, we can make the middle and top layer.---------------
Chocolate Mousse (middle layer) and Whipped Cream (top layer) Procedure
5. Using a saucepan, heat up the 1 cup of heavy cream until it boils, you just want it to scald. In a bowl, pour the hot cream over the chocolate chip and stir until smooth. Let this cool completely, pop it in the chiller to speed up the process. This is basically a ganache.


6. In another bowl, whip the 2 cups of whipping cream using the whisk attachment of your hand mixer. Once soft peaks form, add the sugar and continue whipping until fully incorporated. Taste it, if you want it sweeter, add another 1/3 cup of sugar.
*Tip: Chill the bowl you'll use to whip up the cream. It keeps the cream cool while you're whisking.


7. Once the ganache has cooled completely, fold in 1/2 of the whipped cream mixture. Fold gently as you don't want to deflate the whipped cream.


*Tip 1: Use chip bag clips to seal the bag just before the tip and also at the main opening. This keeps well in the chiller so it doesn't dry up the whipped cream until you're ready to use it.
*Tip 2: Use a glass or a vase to hold your piping bag in place while you fill with the whipped cream.


9. By this time, the brownie base has cooled off completely. Top with the chocolate mouse (ganache and whipped cream) and level with an offset spatula. Tap the pan on the counter once just to let the mousse fill in the nooks and crannies. (You don't want to keep tapping it and deflate the mousse.) Let this chill in the freezer for 1 1/2 hours.


10. Pipe a layer of whipped cream on top of the chocolate mousse and smoothen out with an offset spatula. Return to the freezer and let it set again for about 1 1/2 hours.


11. To release the cake, you can easily run a knife in between the cake and the pan ridge. But this might create streaks. I use the hairdryer method. Let the hair dryer pass through the outside of the pan so it "softens" the edges and releases the cake (once the frost disappears, that's good enough). You can then release the springform pan and smoothen out any edges on the side with your offset spatula.


13. Finally...... ENJOY!!!!


---------------------------------------------------------------------
*Some recipes include egg yolks and gelatine to add to the chocolate mousse and whipped cream layers. Egg yolks are whisked while a hot syrup is added and eventually the chocolate and whipped cream are added. In the gelatine version, the gelatine crystals are left in cold water for it to bloom, hot water is added, then this is added to the base - in this case, chocolate and whipped cream. When this sets, it takes a firmer form. I personally prefer just a straight up ganache and whipped cream mixture with nothing else added. I don't like the jelly-gummy feel of gelatine and well... egg yolks. This recipe holds it's form so I didn't need to add any of the binders. I just relied on the chocolate to use their muscles to hold up the fort.
**You can definitely make the top layer a white chocolate mousse - this will allow it some depth and a sweeter and butter flavour. I just stuck with plain sweetened whipped cream. If you wanted a white chocolate mousse for the top, make a ganache (mix 1/2 cup white chocolate chips with 1/3 or 1/2 cup heavy cream, let this cool, and fold with the whipped cream).
***Springform pans are still best to use when you're working with desserts that need moulding and quick release. In case you don't have one, you can use a regular round cake pan, line the bottom with plastic wrap, line the sides with a border of parchment paper (enough so it can hold it's form), and then once the cake is set, you can pull the plastic our and peel off the parchment rim/border. But of course, you can always just make this cake on a pyrex dish and eat it off from there.
#donyaluzee #food #recipe #chocolatemousse #chocolate #mousse #brownie #browniebase #springformpan #semisweetchocolate #whippedcream #chocolatechips #birthdaycake #birthday #cream #ganache #eggs #cocoapowder


Comments
Post a Comment